Hey there! I’m Karine, and today I’m beyond excited to share with you my latest project – the cuddly t-shirt quilt! You know how we all have those favorite t-shirts that we just can’t part with? Whether they’re from memorable events, favorite bands, or simply those super comfy fits that once made you feel fabulous, they’ve been tucked away for far too long. So here I am, encouraging you (and myself!) to take that sentimental fabric and turn it into something wonderful!
Imagine curling up under a quilt made from all those cherished shirts! The idea of creating a cuddly t-shirt quilt came to me after I sorted through a pile of shirts, and my emotions would swing from nostalgia to laughter thinking about the moments associated with each shirt. That’s when I realized I could turn these vibrant memories into something practical and stylish, and I couldn’t wait to share the journey with you!
Unlocking the Secret: Coats eloflex® Stretchable Thread
One of the coolest aspects of this cuddly t-shirt quilt is the use of Coats eloflex® stretchable thread. This amazing thread means we don’t have to fuss with interfacing the backs of our shirts to stabilize them anymore! So, for those of us who may not be masters in sewing, this presents a forgiving and creative opportunity to avoid the struggle of maintaining the fabric’s stretch while sewing.
This way, you can quilt without the hassle of adhering interfacing to each shirt, making the entire project so much smoother and enjoyable. Whether you opt for superhero shirts or your favorite school apparel, you’ll find this quilting process liberating!
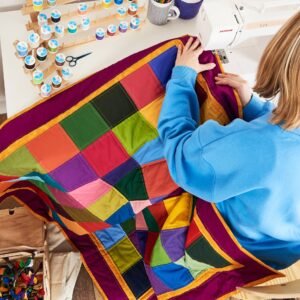
Shaping Your Quilt: Sizes and Layouts
The size of your cuddly t-shirt quilt will largely depend on the shirts you choose and how you cut them. Whether you’re using toddler-sized t-shirts or oversized adult editions, just remember that each size will alter the finished dimensions of your quilt. The example quilt measures about 30” x 48”, but feel free to expand or reduce as suits your preferences!
Choose a layout that reflects your style! You can create rows of colorful shirts or stick to a more monochrome look depending on the mood you want to evoke when you wrap yourself in this cuddly t-shirt quilt. And don’t forget, while cutting, you can maintain as much imagery as possible and play with the arrangement until you’re good and satisfied.
Materials
- Coats eloflex® stretchable thread in coordinating colors
- Solid Cuddle® fleece (amount determined by quilt size)
- 12 t-shirts (or the number you desire)
- Rotary cutter, cutting mat, and ruler
- Safety pins
- Spray starch
Prepare to Create Your Quilty Masterpiece
Preparing for your cuddly t-shirt quilt project can be half the fun! Start by making sure you have your materials sorted and your space set up. Clean off a large area of your table or floor so you have ample room to lay out your t-shirts. It’s also wise to have a good pair of fabric scissors handy for any adjustments!
Trust me when I say that a clean and organized workspace makes all the difference. I’ve learned that a bit of tidiness goes a long way when you’re cutting and sewing – it keeps the creative juices flowing without interruption!
Step-by-Step Instructions for Your Cuddly T-Shirt Quilt
Now that we’re all prepped and excited, let’s dive into the step-by-step instructions to create the cuddly t-shirt quilt! Below this section, you’ll find a detailed guide that will walk you through the entire process: from cutting your t-shirts to binding your quilt. Remember that the full pattern can also be accessed via the link provided, so don’t fret if you lose your way!

Full Pattern: Click Here
Additional Tips for Success
Let’s talk about a couple of tips that will help you ace your cuddly t-shirt quilt project! First off, while laying out your shirts, ensure that they are trimmed evenly to avoid mismatching widths which could lead to an awkward final quilt. It’s worth double-checking that your rows maintain a consistent size. Trust me, a little extra attention will save you a headache later on!
Another great tip is to keep your sewing machine’s tension fine-tuned. T-shirt material can stretch quite a bit; adjusting your machine to accommodate funky fabrics is essential to ensuring everything holds together nicely. Remember, old habits die hard, but with each stitch, you’re honing your craft!
The Finishing Touches
As we approach the conclusion of crafting your cuddly t-shirt quilt, rounding those corners and stitching the binding is crucial. This step not only beautifies the edges but also creates that polished look. Make sure to pin carefully and sew with care, as the finishing details really elevate your quilt from just good to extraordinary!
But don’t forget, our cuddly t-shirt quilt isn’t just functional; it’s a reflection of our cherished memories woven together. So as you add the final touches, think about all those good times you want to cuddle up with when you throw this quilt over your lap!
Celebrate Your Creation!
You did it! Creating a cuddly t-shirt quilt is not just a project – it’s a journey that allows us to celebrate our precious memories while crafting something beautiful and functional. Remember to take a moment to admire your efforts once you’re done; you deserve it!
If this cuddly t-shirt quilt has sparked your creativity, don’t hesitate to explore even more inspiring articles on this blog. It’s a treasure chest filled with amazing projects waiting for you to dive in! You can find an incredible piece ready for your next crafting adventure by clicking here! This blog is truly a delight for creative souls!
So in the spirit of creativity and nostalgia, let’s keep those shirts alive in our dreamy cuddly t-shirt quilt, shall we? I’m looking forward to seeing what you create!