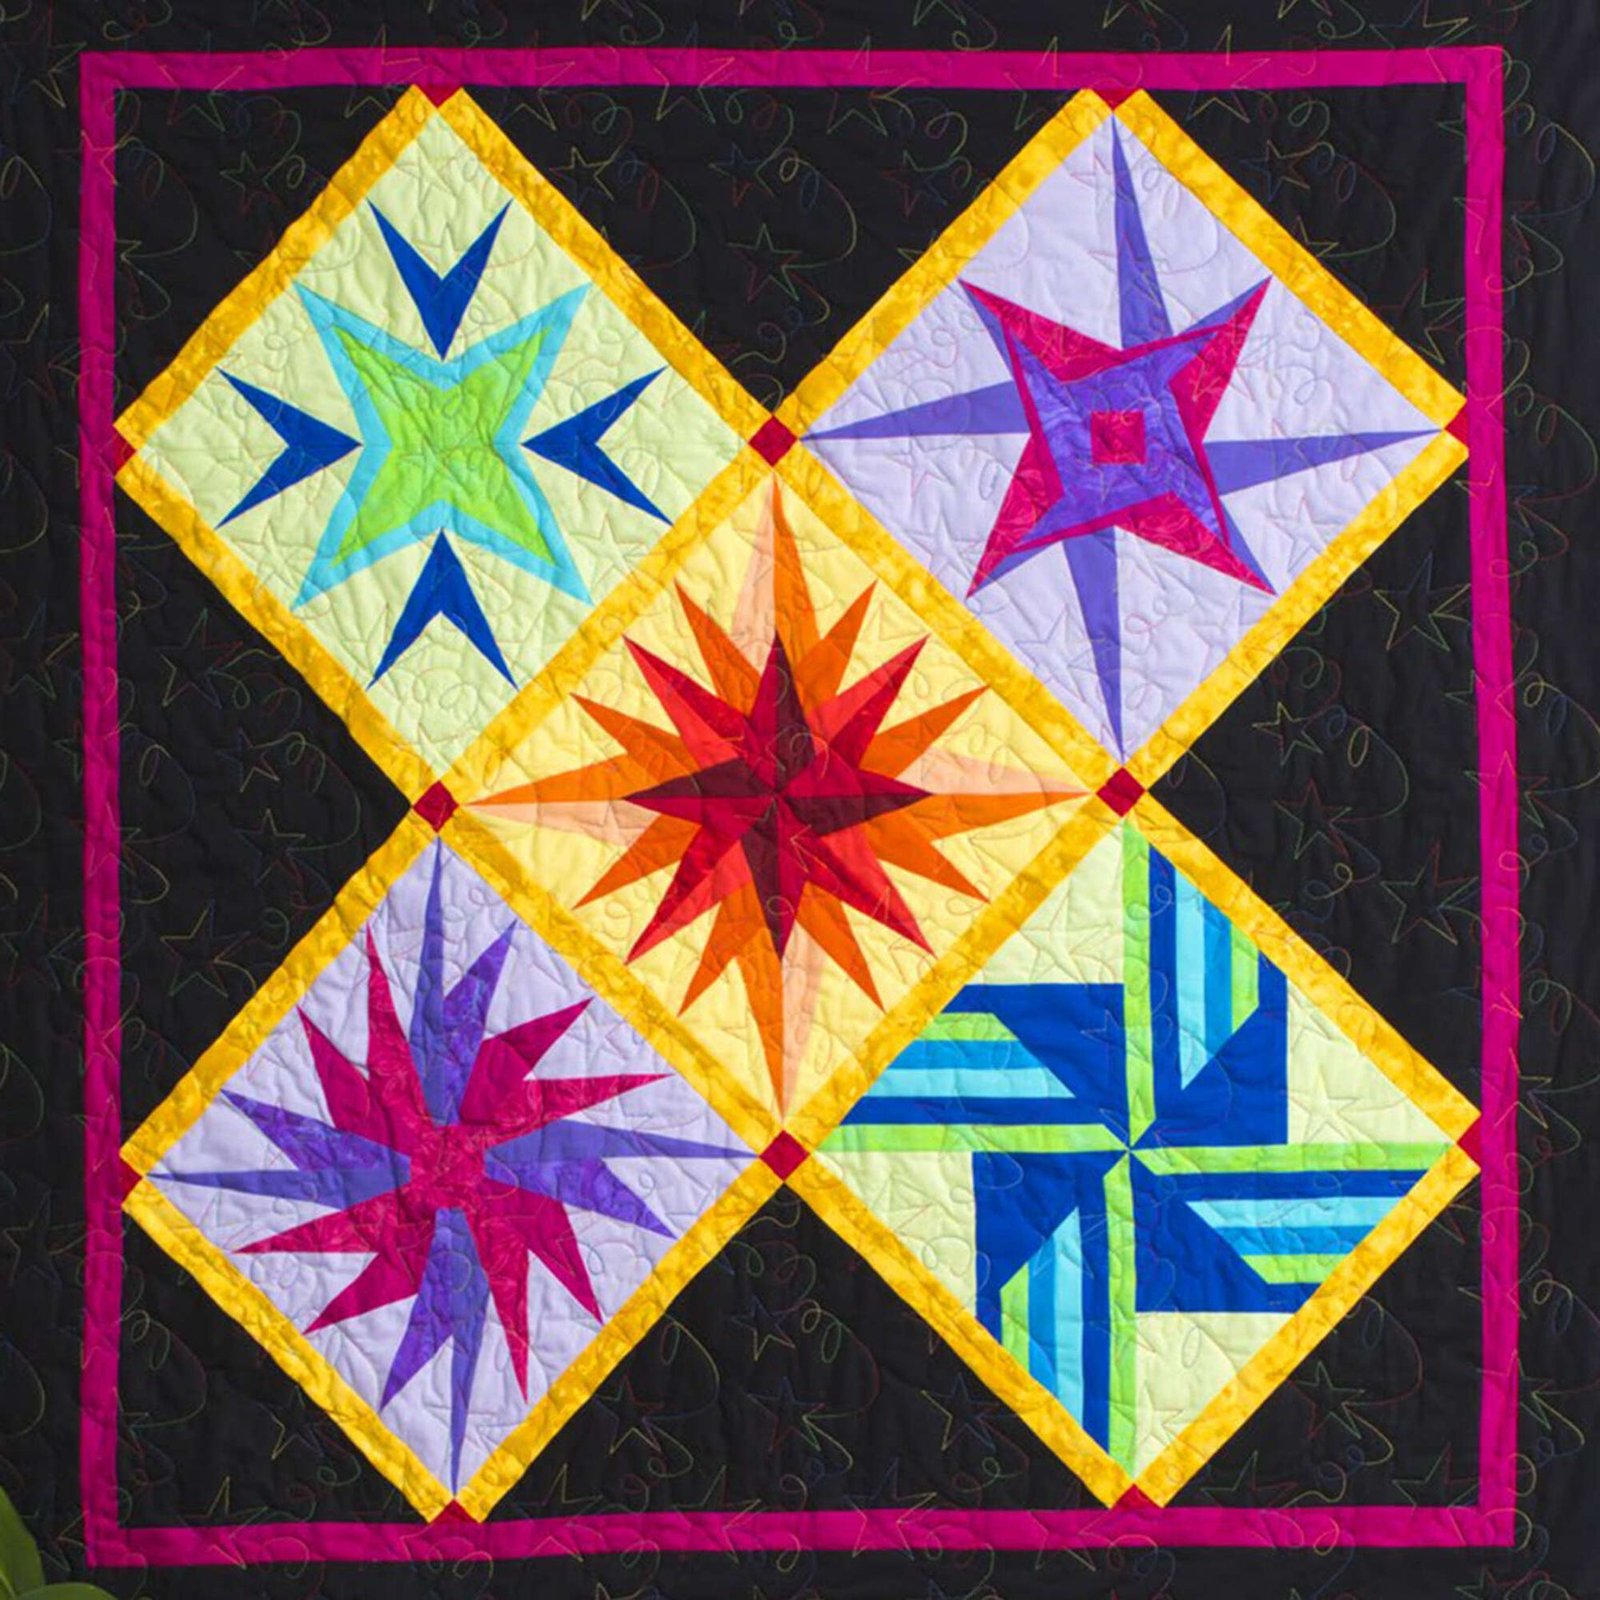
Have you ever laid in the grass on a clear night, staring up at the twinkling stars and feeling inspired by the vast beauty of the universe? I know I have! That moment, lying there, gave me the idea for my latest project – the Milky Way Wall Hanging. It’s not just a project; it’s a labor of love, a way to capture a piece of the night sky and bring it into my home. With its vibrant colors and intricate patterns, this quilt reflects that magical feeling of gazing at a celestial masterpiece.
As I began this journey of creating the Milky Way Wall Hanging, I realized how stitching each piece felt like putting together the galaxy itself. Every block represents a star, every stitch bringing the cosmos closer to home. You might think that the process would be overwhelming, but it quickly transformed into a meditative experience. So, buckle up, friends! Let’s dive into the crafting universe with the Milky Way Wall Hanging!
Why Foundation Paper Piecing Makes the Milky Way Shine
One of the standout features of the Milky Way Wall Hanging is the technique I used—foundation paper piecing. This method allows for precision that regular piecing sometimes lacks. It’s like having a compass and a map as I navigate through each block! By using a template, you can be sure that your angles and points remain flawless, making your stars look as bright as the real ones.
While it may sound a bit intimidating at first, trust me: once you get the hang of it, you’ll be flying through the blocks! Providing a sturdy foundation for sewing means I can create these intricate designs without any hiccups. Paper piecing will elevate your quilting game and leave you with beautifully sharp points—just like the sparkling stars in the Milky Way!
Coloring the Cosmos: Choosing Fabrics for Your Quilt
Color is everything when crafting the Milky Way Wall Hanging! I chose a mix of vibrant shades to capture the ethereal beauty of the cosmos. You can take inspiration from your favorite night sky moments: maybe a deep royal blue for the vastness, vibrant saffron for twinkling stars, or even a splash of tropical pink to represent those fleeting meteors. The combination is part of what makes this project so fun!
Don’t forget to grab some solid coordinating colors too, like black for the background. A contrasting fabric can make the stars pop! Layering colors adds depth and excitement to your finished quilt, making each viewing a new adventure. Trust me when I say that choosing the right fabrics is like selecting the right stars to complete your galaxy.
Gather Your Cosmic Supplies
- 1½ yards of black fabric for setting triangles, outside border, and binding
- 3/8 yard of saffron for sashing
- Fat quarters of various colors: citron, apple green, royal blue, and more!
- Copies of foundation papers (4 each of blocks 1 through 5)
- Low-loft batting (50″ x 50″)
- Backing fabric (3 yards of royal blue marbled)
- Coats Dual Duty XP® Paper Piecing thread
- Coats® Cotton Machine Quilting thread for quilting
Collect everything you need before embarking on this stellar journey. Having all your materials on hand will keep your creative flow going without interruption. Nothing worse than running out of a crucial fabric when you’re mid-stitch!
Prepare for Launch: Tips Before You Start
Before diving into the Milky Way Wall Hanging, take some extra time to prepare. Spend a little bit of time familiarizing yourself with the foundation paper piecing technique. There are fantastic resources online that break it down into bite-sized nuggets, which will give you the confidence to tackle those intricate blocks!
Additionally, I recommend printing the foundation templates on lightweight copy paper for ease. This paper tears away easily, which is perfect for showcasing your beautiful work. Remember, practice makes perfect! If you make a mistake, don’t stress. Each little hiccup is merely a stepping stone toward your masterpiece.
Embark on Your Quilting Journey
Alright, fellow crafters! Below you will find the steps to begin crafting the Milky Way Wall Hanging. The detailed instructions for each block can be accessed through the link I’ve provided. Get ready to make something spectacular!
Full Pattern: Click Here
Additional Tips for Success
When working on the Milky Way Wall Hanging, take breaks! It can be easy to get lost in the stars, but your hands will thank you later. I like to stretch, sip on a warm beverage, and rediscover my creative spark whenever I feel a sewing slump coming on.
Also, utilize your sewing machine’s settings to your advantage. Experiment with stitch lengths to see what works best for your fabric and the intricate details of the blocks. You’re the captain of your creative ship; navigate wisely!
A Little More about the Details
One of my favorite aspects of the Milky Way Wall Hanging is choosing how to quilt it. Since the quilt has many intricate details and varying fabric colors, I recommend opting for a simple quilting style to keep the focus on your craftsmanship. Maybe a meandering trail to represent a comet, or star motifs to add an additional layer of texture?
Furthermore, don’t shy away from embellishments! A few hand-stitched stars or glow-in-the-dark thread in certain areas can make your quilt truly celestial. Be bold—let your creativity blast off!
Celebrate Your Cosmic Creation!
Once you’ve stitched up the Milky Way Wall Hanging, take a moment to bask in your accomplishment. Crafting brings so much joy, and each stitch tells a part of your story. Hang your quilt up and commemorate your journey as it transforms your space into a cosmic gallery!
And hey, if you’re feeling inspired, you should absolutely check out the treasure trove of creativity on the blog! There are tons of fantastic projects out there waiting for you to dive in. You won’t want to miss it—explore more amazing content by discovering an incredible piece prepared just for you by dazzling your cursor on this link.
As you ponder your next sewing adventure, I hope you’ll take the memories created while working on the Milky Way Wall Hanging with you. Remember, each quilt crafted is a step towards crafting a galaxy of your own!